Skip to content

Cookies 🍪

This site uses cookies that need consent.

Learn more

Zur Powderguide-Startseite Zur Powderguide-Startseite

Language selection

Search PowderGuide

SnowFlurry

SnowFlurry 4 2018/19 | Snow profile review

Learning with examples

by Lukas Ruetz 12/10/2018
At first glance, snow profiles seem complicated. However, if you know a few basic terms, this impression is quickly put into perspective. But even if you can read profiles, it takes some practice to draw the relevant conclusions from them. The most important thing, however, is to be able to visualize the snow cover and its layering in the terrain. An example:

Profile from 21.01.2018 - Sellraintal: Peida, Jaggler Anger

The snow profile was recorded on 21 January 2018 in a field (Anger is the name for a flat agricultural area in the Bavarian-speaking region) at 1480m above sea level - i.e. during the days with the extremely intensive snowfall in the 2017/18 season and the partly declared warning level 5 in Tyrol and Switzerland. The slope inclination is therefore also given as 0°, i.e. a completely flat surface. This means that no slope exposure can be assigned to the profile. However, the remark "location shaded all day in early and high winter" seems interesting. With regard to the influence of radiation, the snow cover thus corresponds to a north-facing slope of steeper 30°. This is because northern slopes with more than 30° also do not receive a single direct ray of sunlight in our latitudes from late fall until the end of high winter.

The snow cover is 128 cm thick and has 14 layers. The air temperature is -5.4°C, the snow temperature on the surface -3.1°C (warmed by diffuse solar radiation), also -3.1°C at 50cm and 0°C at the bottom. If you look at the temperature at 50cm and at the surface, there is no temperature gradient, the snow has the same temperature. The snow cover is therefore isothermal on a large scale from the surface to a height of 50 cm - the red temperature line goes vertically downwards. In reality, it is highly probable that there are different temperatures in the snow depths in this area, but no further measurements were taken in the intermediate area, as the temperatures probably do not differ greatly. Theoretically, however, jumps from e.g. -20°C to -2°C could be hidden in this section, they were just not measured.

SnowFlurry
presented by

To the layers

A snow profile is always recorded and read from top to bottom: So the first layer with the + symbols shows beautiful, dendritic new snow crystals with a size of 1-2mm and a hardness of 1 = FA = blue bar. This means that you can easily penetrate the layer with your fist. It is located from 128cm to 78cm in height, i.e. 40cm thick.

The second layer with the thick dot and the slash shows round-grained snow crystals and felt, i.e. snow crystals that are progressively degrading. Felt is the first step in the degradation from a beautiful new snow crystal to a round grain. The branches of the snow crystals break off and it looks more matted. The layer has a hardness of 2 = 4F = blue bar. It can therefore still be penetrated horizontally with four fingers using moderate force.

Below this is 1 cm of surface frost (V symbol) with a grain size of 2 - 5 mm, again with a hardness of 1 = fist. Interesting here is the yellow line at the upper layer boundary with the ECTP note. The "Remarks" field contains the exact test results. In two Extended Column Tests, the layer of surface tire broke when the 90x30cm block was cut out without having to load the block from above. This is the worst result in the extended column test.

Up to this point, all layers were dry (number 1 in the column before the grain symbol), the subsequent layers are all slightly moist (number 2 in the same column).

A thin, fairly hard (hardness 4 to 5, almost impossible to penetrate with a pencil) enamel crust (spectacle symbol) follows. This is followed by a weak layer of relatively small (0.5mm - 1mm) and soft (hardness 1 = FA) angular crystals (square symbol). And underneath, fusion crusts of different hardnesses always alternate with mainly angular-rounded crystals.

Rounded-edged means: The snow crystals were transformed in a building-up process (i.e. to angular crystals or subsequently to deep frost) and later transformed again in a degrading process. In the process, the facet shapes with edges and corners become rounder again. As there is no "deep frost-rounded" symbol, deep frost that has already undergone a noticeable degradation transformation is also called angular-rounded. The former weak layers have solidified again at least somewhat, in some cases noticeably, due to the resumption of the degrading transformation. None of them still have hardness grade 1 (fist).

Interpretation

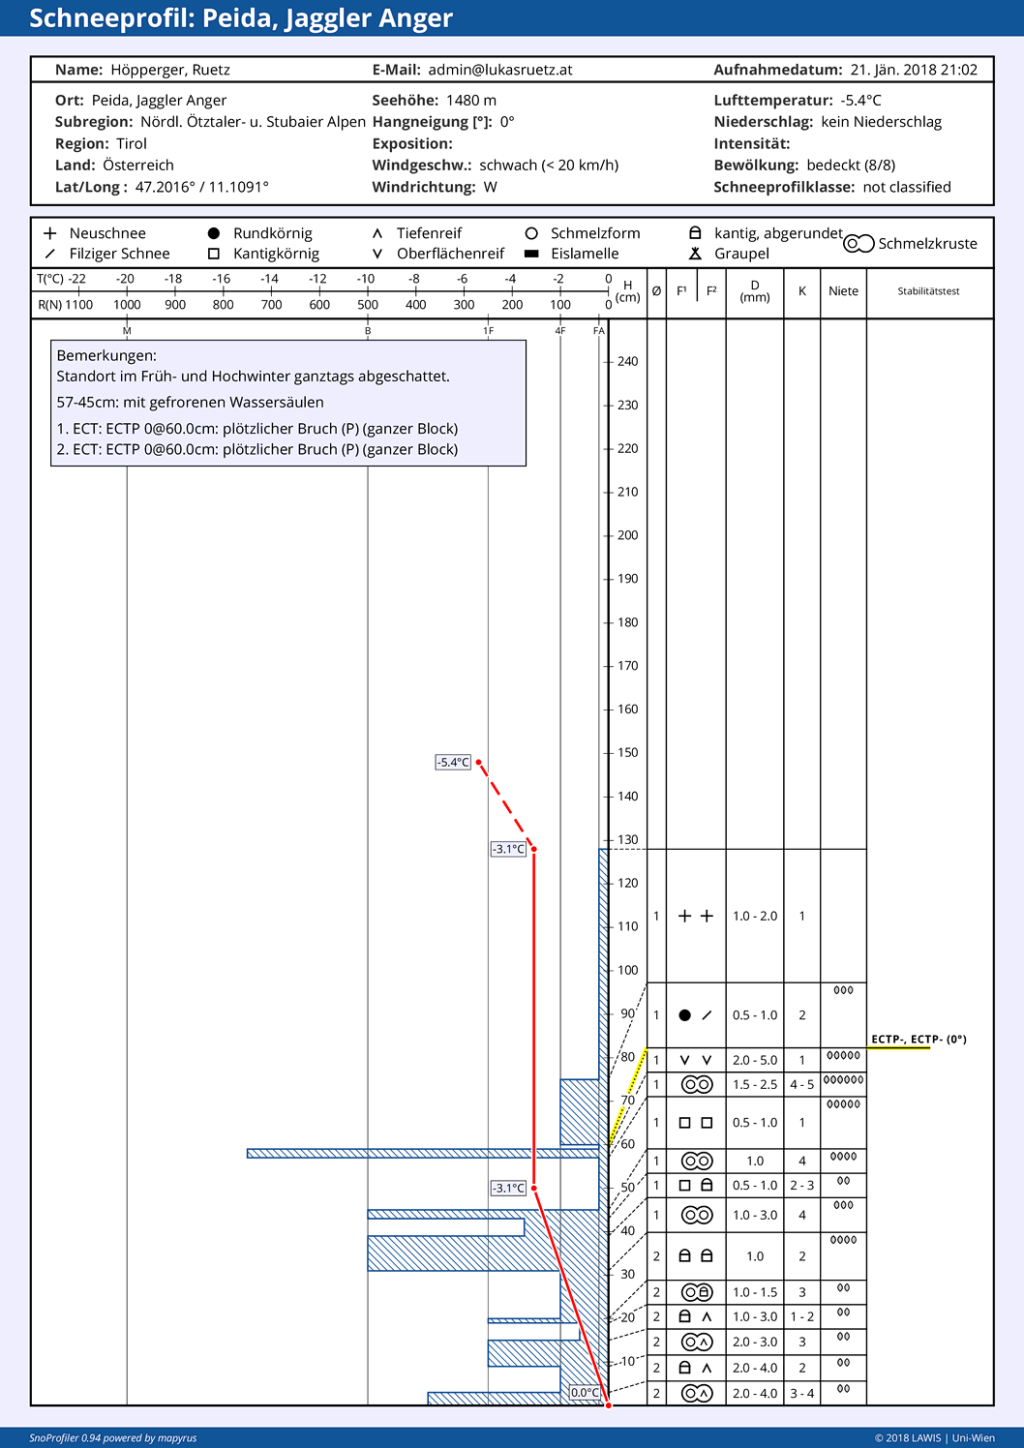
The snow profile shows a very interesting sequence in the lower area between melt crusts and formerly built-up layers (angular & deep rime) that have already undergone noticeable degradation (rounded off). The degradation of the weak layers is caused on the one hand by a low temperature gradient and on the other hand by the pressure of a heavy load from recent snowfall.

The layers up to just over 30 cm are slightly moist. It is no longer possible to say whether the ground heat has had an effect here or whether a higher air temperature or even rain was the decisive factor for the moisture penetration some time ago. At this altitude, it could have been anything in January. The same applies to the numerous melting crusts - whether rain or temperatures a few degrees above 0 can no longer be said.

There is a large amount of fresh snow, which must come from a high intensity of precipitation that is still taking place or has just finished. Because if the snowfall at a snow temperature of -3°C had already been half a day or more ago, most of the fresh snow would already have been converted to felt. At a high absolute temperature, transformation processes take place much, much, much faster. Whether degrading (= settling) or building transformation.

With a gradient from -5°C to 0°C on one centimetre of the snow cover, the building transformation (= facet formation) takes place much faster than with a gradient from -20°C to -15°C per centimetre - although the gradient is equally pronounced. The strength of the gradient only determines whether the snow cover transforms by breaking down or building up, the absolute temperature determines the transformation speed. Temperature is nothing other than the speed of movement of the molecules - the warmer, the faster. If the anthill scurries faster, then it can build something up more quickly but also break it down. This is why deep frost forms much more frequently near the ground, because it is always 0°C warm there (ground heat from the earth's interior) and therefore the absolute temperature is very high.

The same applies to decomposition or settling: Isothermal at -1°C is quite different from isothermal at -20°C. In both cases, the snow cover degrades. In the first case in a few hours to days to a completely compact stick of round-grained crystals, in the second case in tens of weeks.

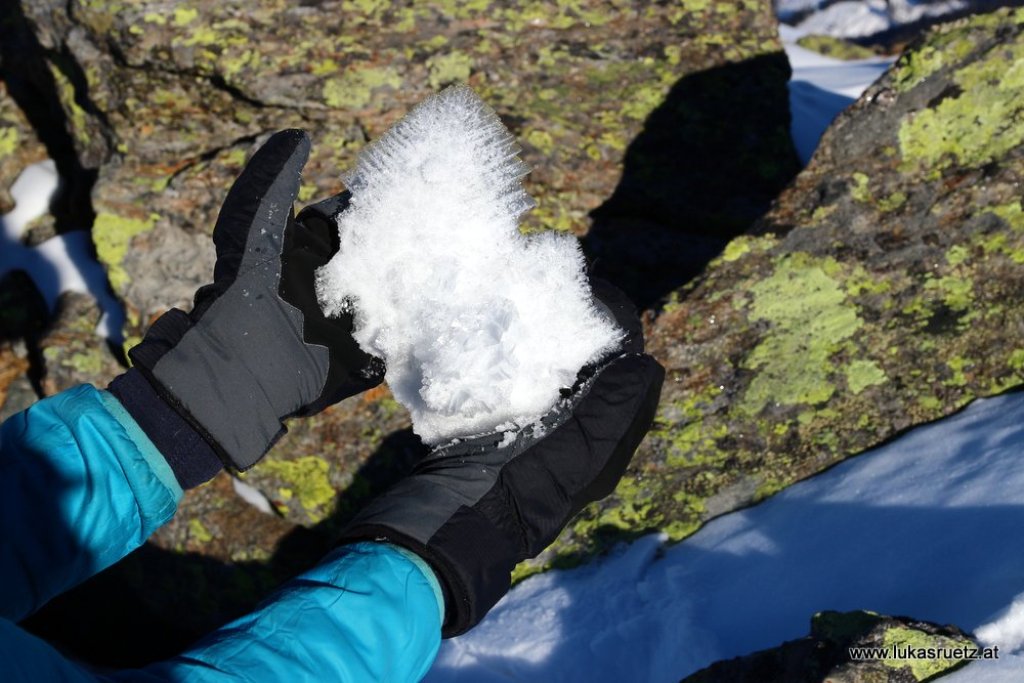
The former weak layers close to the ground are de facto no longer relevant for the avalanche risk. They are already noticeably solidified again. What is relevant, however, is the layer of surface frost - very easy to derive from the ECTP0 test result. However, if the surface frost is not to be found over larger areas, the angular layer just below it plays the greater role for the avalanche risk. A PST (Propagation Saw Test) would have been useful here to assess the behavior of this angular layer. With an ECT, it was hardly possible to address it due to the overlying V-layer, as the surface frost had already broken beforehand. This means that the surface tire takes the necessary snow slab from the following weak layers. With a PST, in which you "cut" through the weak layer with a string or saw, you can test a weak layer directly without including the overlying weak layers in the result.

In this case, the weak layer of surface frost has already generated small settlement noises when the terrain is entered. A subsidence noise occurs when a weak layer breaks, the snow slab sinks slightly and the air between the crystals of the weak layer is pressed out at the tensile cracks. The settling noise is, so to speak, the release of the snow slab on the flat. In other words, where the snow slab cannot slide off after breaking due to the insufficient steepness. The weak layer then breaks in exactly the same way, but the snow slab remains in place. It only changes its position by a few centimetres of descent.

Note: The temperature gradient determines whether a build-up or degradation transformation takes place. The absolute temperature subsequently determines the speed of the transformation process.

This article has been automatically translated by DeepL with subsequent editing. If you notice any spelling or grammatical errors or if the translation has lost its meaning, please write an e-mail to the editors.

Show original (German)

Related articles

Comments

SnowFlurry
presented by