Skip to content

Cookies 🍪

This site uses cookies that need consent.

Learn more

Zur Powderguide-Startseite Zur Powderguide-Startseite

Language selection

Search PowderGuide

mountain knowledge

Moutain knowledge | Crevasse rescue Part IV - Rescue methods

The bottle comes out of the gap with a pull

by Knut Pohl 03/12/2014
In six articles you will learn everything you need to know about emergency rescue from crevasses. Part IV deals with the various rescue methods.

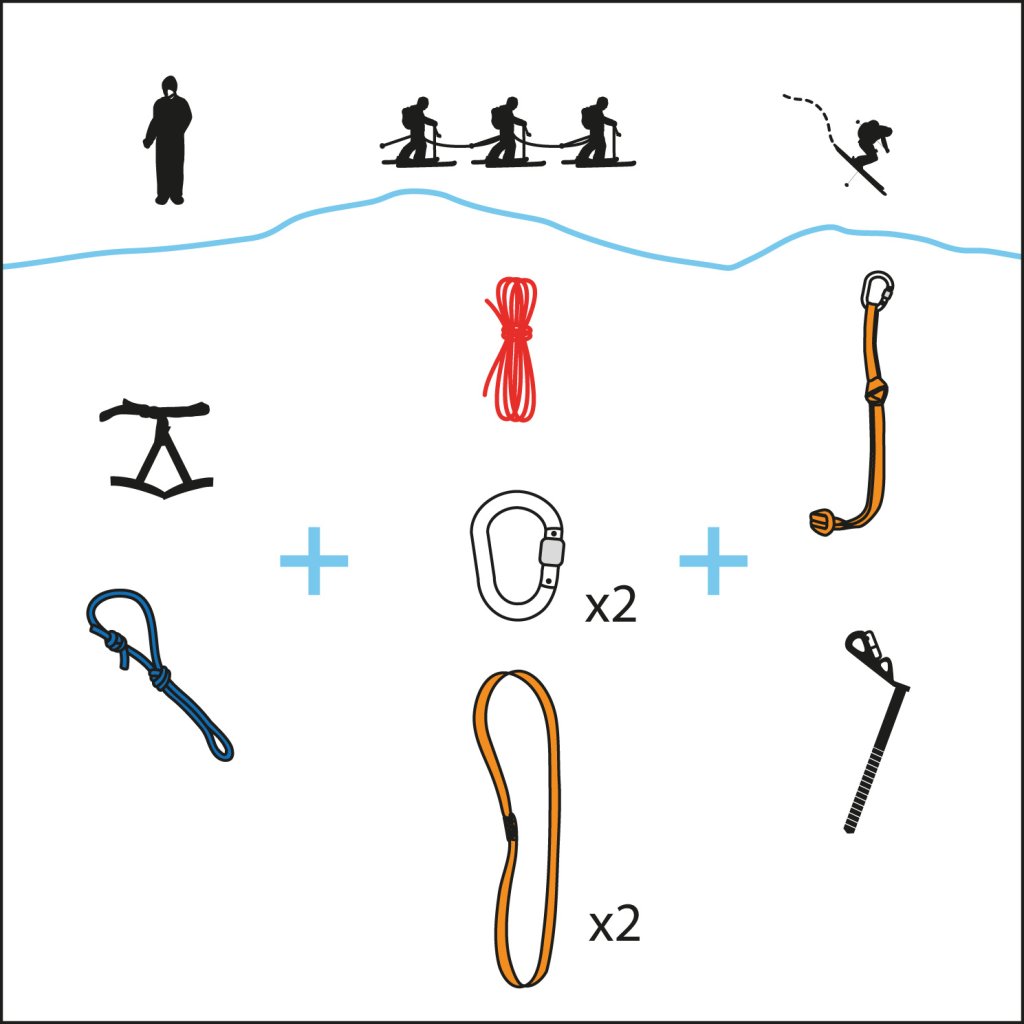
Crack rescue is one of the topics that most tourers, ski mountaineers and freeriders find very complex. However, the basic principles are actually quite simple and the tools are not rocket science either. Once you have understood both, you are actually equipped for all situations on the glacier. Today, we would like to introduce you to the various methods of rescue.

This part of crevasse rescue is the one that most instructional publications focus on - if they deal with the other areas at all. And even then, only the pulley systems are usually explained. It is so well structured and therefore easy to explain in a book. But here too, with knowledge, brains, experience and the necessary self-confidence to make useful decisions in stressful situations, you can react much more flexibly and adapted to the situation than if you only have the "F" scheme in your head. This is why the current section is called "Recovery methods" and not "Pulley block". The reason for this should become clear from the first rescue method.
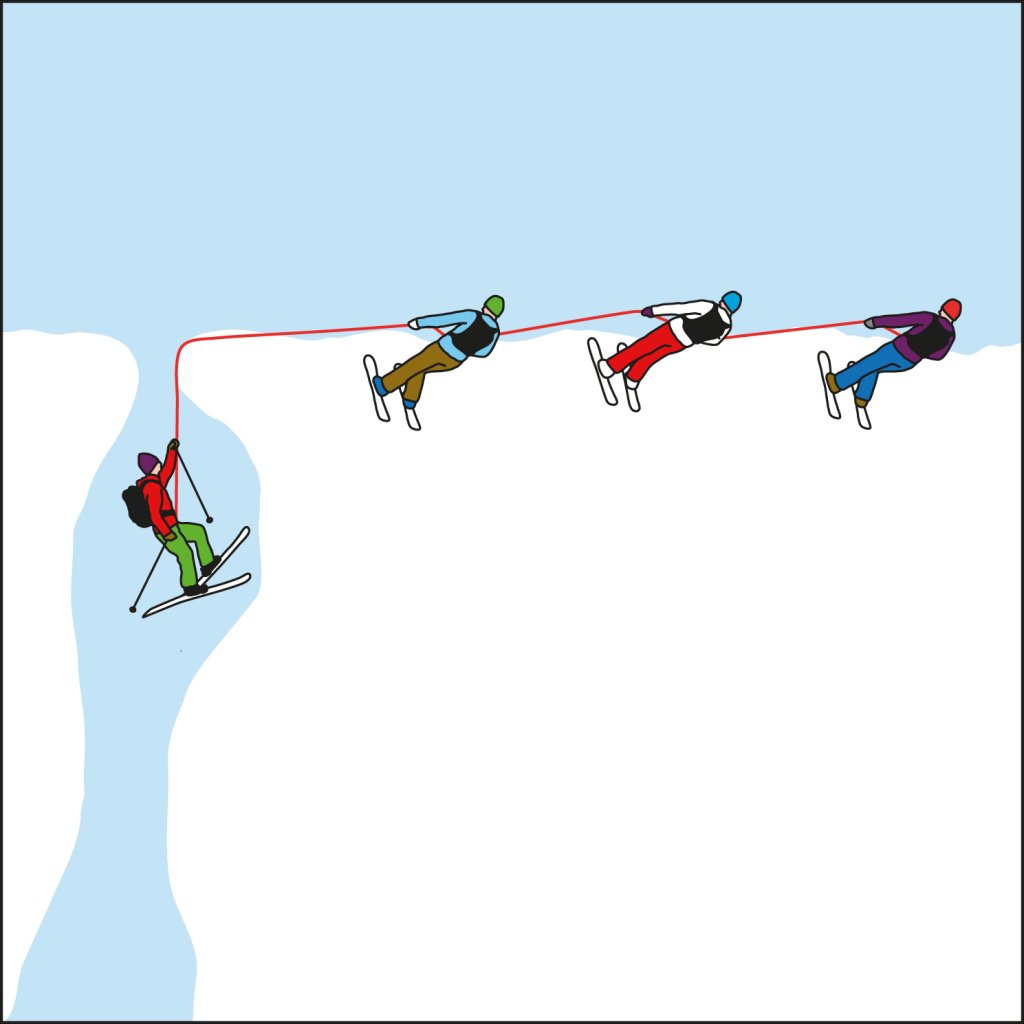
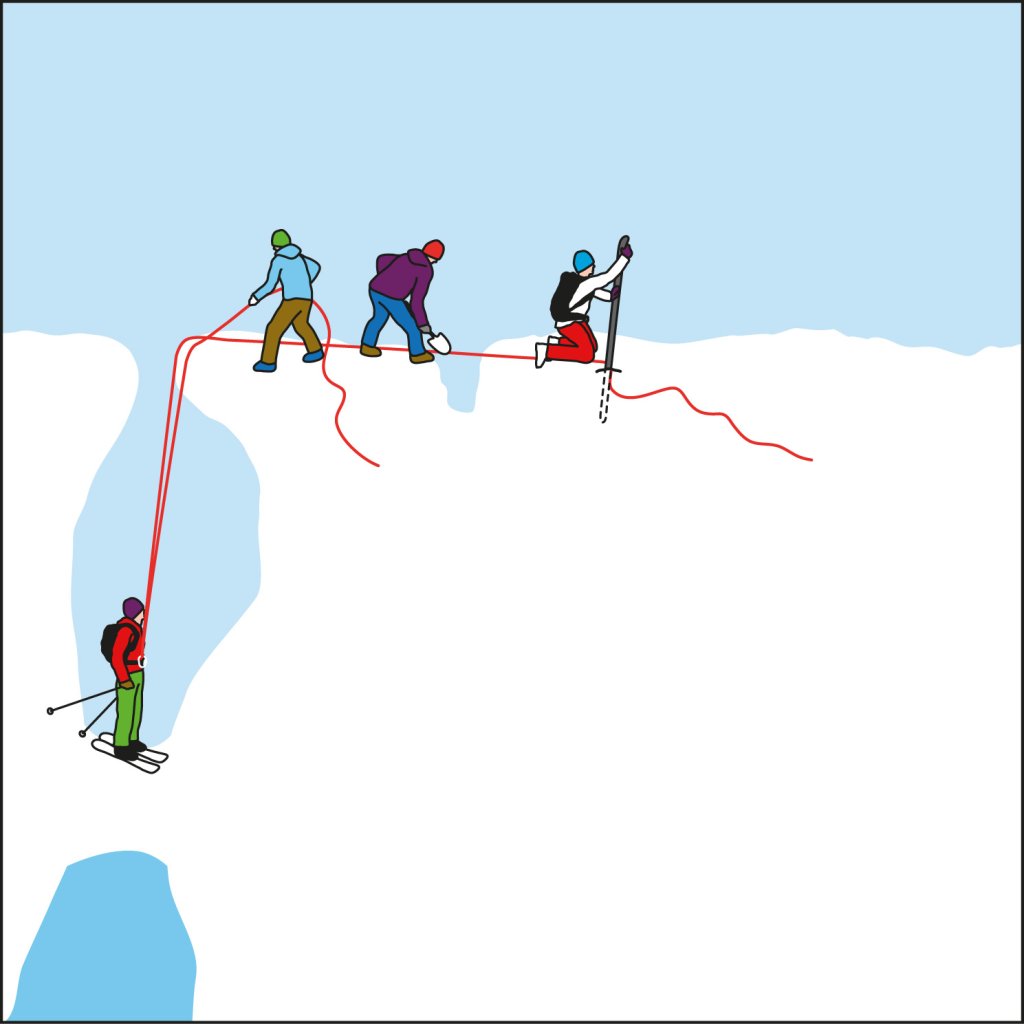
Sliding out

It may not be the most likely scenario, but it is not so impossible that it should not be mentioned. Particularly at the edge of a glacier, it is possible that the crevasse in which the fallen person is located has a solid, load-bearing floor and reaches the glacier surface somewhere, at least to the extent that it is possible to climb out - possibly with the help of companions from above. As a rule, not only the person who has fallen, but also the other rope team members should remain secured to the rope. It is also only advisable to continue in the crevasse if the floor of the crevasse is really stable beyond doubt, i.e. consists of solid ice or old snow that is several years old, or if the crevasse is so narrow that a deeper fall can be ruled out. Deeper snow bridges in the crevasse can be particularly treacherous. Probing the ground with an avalanche probe is also an option.

mountain knowledge
presented by

Self-ascent

Another method of escaping the crevasse is to self-ascend using a rope. If the person who has fallen is uninjured and the crevasse offers enough space for movement, this is usually the quicker and easier method. To do this, first take off your backpack, skis, poles and the like and attach them to the climbing harness with a long sling, whereby it is a matter of taste whether the load is attached to the back of the harness or to the rope eyelet. In any case, it should hang so low that you cannot reach it with your feet. If you don't have a sling or cord at hand, you can clip everything to the rope so that it dangles below you in the rope loop, which gets longer as you climb.

Now the hand loop is attached to the rope loop of the climbing harness using the locking carabiner. The clamp knot should be at about chin height on the rope, whereby a Prohaska is easier to use than a Prusik.

The long cord is doubled and tied around the rope in the middle using a Prusik. Now tie two laid sack stitches at a distance of approx. 80 cm. The distance should be such that a foot can be inserted into the loop between the sack stitches and does not slip out again so easily. The loop length is correct when the Prusik is approximately at the height of the climbing harness and the leg is almost stretched out in the loop.

Now push the hand loop knot upwards as far as possible and put weight on it. Then pull on the leg while pushing the Prusik of the leg loop up as far as possible. Now stand on your leg so that the Prusik grips the rope and, as you stand up, push the knot on the hand loop as far up the rope as possible and then sit back down in the harness. To avoid the consequences of incorrect use, you can clip the rope below the foot loop into the rope eye at regular intervals with a carabiner by means of a mast throw, thus reducing the maximum fall height.

Alternatively, you can also use a Tibloc and pulley with a backstop. To do this, the pulley is clipped into the rope eye using a locking carabiner and the Tibloc with a suitable carabiner is clipped into the rope above it. The (slightly longer) foot loop is then hooked into this.

Brake knots can be overcome in self-ascent on the rope by hooking into the brake knot with a free locking carabiner, then detaching the hand loop from the rope and reattaching it above the brake knot. Now stand in the foot loop, clip yourself back into the hand loop and only then unclip yourself from the knot. The knot can then be released.

If the lip of the crevasse is overhanging, it is recommended that your companions remove it from above. If this is not possible or if you want to actively help, the rope between the hand loop and the foot prusik can be redirected using a rope clamp with a pulley or a Garda brake attached to the rope eyelet so that it can be clipped into a carabiner attached directly to the clamping knot of the hand loop. To do this, the hand loop must be tied off with a figure of eight directly after the clamping knot. This rope shortening allows you to get very close to the lip of the crevasse. Shortening the hand loop without redirecting it can also be helpful.

mountain knowledge
presented by

Team hoist

In the case of large groups and only one casualty, the team hoist is usually by far the quickest and most effective method of recovering the casualty. If the group is large and the casualty is easy to hold, it may even be possible to dispense with an anchor. However, if there is even the slightest risk that a falling rope team member could cause problems, a strong anchor is first set up into which the rope is clipped. Then all members of the rope team, coordinated by the foremost member, pull the fallen person up evenly as in a tug-of-war. It often makes sense to take off the skis for this.

In any case, you should get a picture of the situation and, if possible, make contact with the person who has fallen before simply starting to pull.

Pulley blocks

True to the physical principle of work = force x distance, a pulley block helps with the rescue by reducing the force required but increasing the distance that the rope has to be pulled in. Working with such force reductions, even weak people can easily rescue heavy companions and the rescue can take place regardless of the condition of the person who has fallen. Similar to constructing an anchor, setting up a pulley block in winter is much more tricky than in summer and the soft snow on the lip of the crevasse and around the anchor or icy ropes can quickly lead to difficulties. However, the procedure is basically no different to that in summer.

Simple pulley block This design represents the basic form of the pulley block, is relatively simple to set up and requires relatively little material. With its 3:1 reduction ratio, it provides enough support for the rescue, even if the friction in the system is high. For this purpose, the rope is deflected at the anchor point and fitted with a backstop. A rope pulley with an integrated backstop can be used for this purpose, or a clamping knot (Prusik, cross clamp knot, Prohaska - the latter requiring the least handling). A carabiner is now attached to the loaded strand of the rope using a rope clamp (Tibloc or clamping knot). The rope deflected forwards at the anchor point is clipped into this and deflected backwards.

Now pull on the loose end of the rope until the front rope clamp comes close to the anchor point. If you are using a knot in the anchor point, make sure that it runs through the rope and - especially with the Prusik - that it is held open. Now carefully relieve the load on the rope until the backstop on the anchor engages and then push the front rope clamp on the loaded rope as far forward as possible to start a new hoisting cycle.

SWISS CABLE HOIST It is actually always worth upgrading a single pulley hoist to a double or Swiss pulley hoist using an auxiliary rope and achieving a comfortable 5:1 reduction ratio with little additional effort. Instead of deflecting the rope directly at the front rope clamp, an auxiliary rope is attached to the anchor using a figure-of-eight knot and normal carabiner, deflected in the front rope clamp and clipped into the loose end of the rope using a carabiner fixed with a mast throw. The friction is not significantly increased, but the effort required is considerably reduced. However, this means that the front rope clamp has to be pushed back on the rope much more often.

For brake knots in the rope, let the rear rope clamp in the anchor take over the load well before the knot reaches the deflection in the anchor, clip the rear mast throw carabiner of the auxiliary rope (also required for a simple pulley) out of the rope and also into the anchor point. The front rope clamp is now removed from the rope and reattached below the knot. There are now two options:

mountain knowledge
presented by

LOAD TRANSFER The easiest way to do this is to cut the mast throw of the auxiliary rope so that the rope is as taut as possible and then release the backstop at the deflection point and transfer the load to the front rope clamp. Now the section of rope between the front rope clamp and the deflection point, where the knot is located, is relieved and the knot can be untied. Then pull the rope back in until the load is in the rear rope clamp, restore the original condition of the auxiliary rope and continue with the rescue. This method is relatively simple, but the load transfer is never completely loss-free, which can cause jerks in the rope that can be unsettling for the person who has fallen.

CANADIAN TOW The Canadian pulley is used to overcome knots without loss. To do this, the auxiliary rope is wound several times through the carabiners on the front rope clamp and anchor point. If you now pull on the free end of the rope, you can release the rope to the anchor point. The auxiliary rope is now tied off using a back-secured slip knot and the brake knot in the rope can be released. The slack rope is retrieved and you can continue after restoring the original condition. This method works without loss, but requires additional knowledge.

Loose pulley

Of course, the loose pulley (or Austrian pulley) is also a pulley. However, this method requires the person who has fallen to help and clip the rope into their harness, requires a long rope reserve and is therefore not universally applicable in every situation. With its 2:1 reduction ratio, it also requires a relatively large amount of force, but the person who has fallen can actively help and the system has little friction loss. In addition, brake knots are not a problem as they can be removed before assembly.

To assemble, the rope is fixed in the anchor point using a mast throw and locking carabiner and a locking carabiner is clipped into the loose end of the rope. A rope loop with the locking carabiner is then lowered to the person who has fallen so that they can clip into the loose end of the rope and this is deflected in their harness. The end of the rope running back upwards is attached by the rescuer to the fixed end of the rope running downwards by means of a Prusik knot (the rescuer can belay himself with the same auxiliary rope line). Now throw the rope over your shoulder, as in a classic body belay, so that it runs under the pulling arm over your back and the opposite shoulder back to the front. This allows you to pull with pressure from your legs and use your whole body, whereby the person who has fallen pulls themselves upwards on the fixed rope and thus helps.

mountain knowledge
presented by

The use of a pulley with a backstop (e.g. Microtraxion) in the locking carabiner on the harness of the person who has fallen is easier to handle and set up than the Prusik connection using an auxiliary rope. This is simply hooked into the rope and lowered to the climber together with the clipped-in locking carabiner. This eliminates the need to set up and handle the prusik.

RescYou

The newly developed RescYou from Mammut is a device for crevasse rescue that is unbeatable in terms of simplicity of use and planning of the required equipment. This simple and ingenious device consists of two rope clamps that are connected by means of a pulley pulley made from a thin cord, whereby one of the two rope clamps can be fixed by means of a carabiner that is also included.

The highlight is that it can be used for both self-ascent and companion rescue without any major differences in handling. The carabiner is simply hooked into the anchor for companion rescue or into the rope eyelet for self-ascent and the two rope clamps are attached to the rope. Now push the front rope clamp as far as possible along the rope and then pull it back in using the integrated pulley. The 7:1 reduction ratio allows anyone to lift the load and the pulley block on roller bearings has almost no friction. Once the front rope clamp has been retracted (leave a small gap to the rear rope clamp), the slack rope between the rope clamps is simply retracted by pulling it through the rear rope clamp. Now you can start a new lifting cycle from the beginning.

Brake knots in the rope are not an obstacle because the rope clamps can simply be placed over them one after the other while performing a lifting cycle. To avoid the consequences of operating errors, the rope can be secured at regular intervals with a locking carabiner using a half-mast throw in an anchor or rope eye.

The Mammut RescYou therefore requires little knowledge of its use, is easy to operate and easy to carry. The high gear reduction alone makes it relatively slow to use.

Note: It should be noted that the Mammut RescYou is currently being recalled for two production batches.

Next part: Procedure for crevasse rescue.

Photo gallery

This article has been automatically translated by DeepL with subsequent editing. If you notice any spelling or grammatical errors or if the translation has lost its meaning, please write an e-mail to the editors.

Show original (German)

Related articles

Comments

mountain knowledge
presented by